Safety

Smoke Detector Checks: A Vital Winter Checklist

Unseen Guardians: Winter-Proofing Your Home Against Silent Threats

It's the holiday season, and that means, for us up here in the northern hemisphere, it's also the coldest part of the year. Heaters are turned on, people are bundled up in blankets and coats, and everyone is probably feeling a little drowsy with the sun rising later and setting earlier. But, it isn't all snow and hot cocoa - heaters, especially those using gas, present a twofold danger if they ever malfunction. We are, of course, talking about fire and carbon monoxide. 

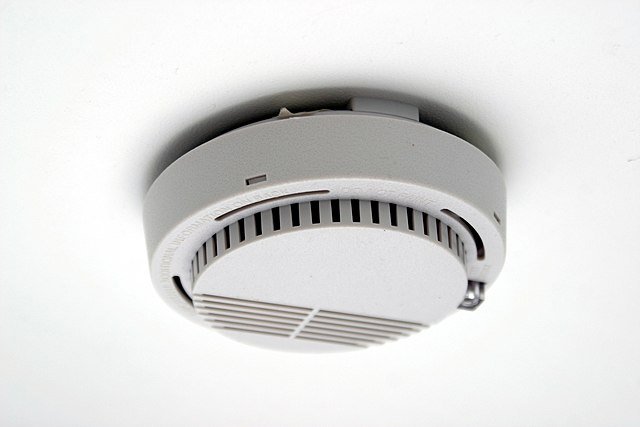
Your house does have detectors, but there is no time like the present to make sure that those detectors are good to protect yourself and your family during the winter. So, what are the differences between smoke and CO detectors, what does each warn you of, and how can we make sure that our detectors warn us the moment there is danger?
Now, you may be asking, “aren't smoke detectors and carbon monoxide detectors the same thing?” and this is a perfectly valid question. Both are designed to tell you of a danger to your breathing, and warn you before it gets to a serious level. But, they warn you of two very different dangers that can be presented in the home.


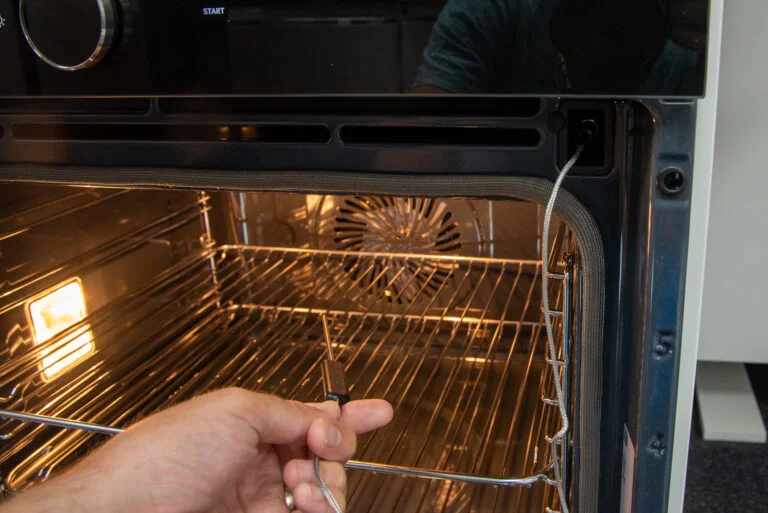
Our first stop should be a quick familiarization on the danger here. For the uninitiated, carbon monoxide, or CO, is an invisible and odorless gas that is extremely dangerous to the human body. It is very commonly found as a byproduct of gas burning devices, such as water heaters, gas ovens, and most prevalent during the winter, any gas heating devices for your home. Now, most devices that use gas to generate heat have excellent methods of ensuring that no CO escapes into your home during operation. However, these devices can be damaged, be that by natural wear and tear or by some other means. Even a small leak in the exhaust of a gas oven can prove dangerous for the occupants of a home, so it is incredibly important to make sure that the people inside the home are kept safe.

Smoke presents a more obvious danger, as it is very visible, though the danger is similarly found in the risk of breathing it in. Thankfully, smoke is not present unless there is a fire somewhere in your home. But, the risk is still present - especially with heat sources in the home that may not have been on since last winter.

Of course, with either threat, safety is most easily found by keeping your detectors up-to-date and well-maintained. Due to the differences in design, though, your smoke detectors and your CO detectors have a few differences in their maintenance. We have a few tips for you to follow with either one, that way you can make sure your home and your family are protected in case of a fire, or a carbon monoxide leak.


Here are a few tips for you to remember with your CO detectors:

  • Keep them clean! Using a dry cloth to wipe any dust from the detector is an excellent way to make sure that they're able to detect the gas without being choked up by household dust.

  • Replace your batteries! As a device that is constantly on to constantly be on guard, the batteries in your CO detector can run out over time. Typically, it is advised that you should swap batteries twice a year. We advise, if you haven't had a chance to change batteries in a while, make sure to do so now so that you're in the best posture for safety.

  • Check their age! Like regular smoke detectors, CO detectors have components that begin degrading over time. Most devices have a lifespan of five years, and a device expiry date should be somewhere on the device. A good rule of thumb on this - if you can't remember when the device was installed, and you can't find a date on it, it's best to go ahead and have it replaced.

  • Make sure you can hear them! Carbon Monoxide detectors should always be in areas where you can easily hear the alarms - especially if you're sleeping when they go off. The greatest risk of CO poisoning comes when you are asleep. So, make sure the detectors are capable of waking you up so that they can keep you safe in case you have a dangerous leak in the home.


And here are some important tips to remember for your smoke detectors.

  • Cleaning is universal! Making sure your smoke detectors are clean of dust works pretty much the same as your CO detectors, so follow the same instructions we mentioned above and you should be golden.

  • Batteries are vital! Your smoke detectors may be hard-wired, but even then, you will still have battery backups. Regardless of what type of detector you have, you should swap batteries at least once a year.

  • Test them! Take some time to use the test function on your detectors. There should be a little button on the front, so try to go through and hit every detector in the home to make sure they are all functioning correctly. It is recommended that you do this once a month.

  • Check the age! Just like your CO detectors, smoke detectors have a certain limit to how long they can function correctly. Most smoke detectors last ten years, but it is always best to check your detector to make sure they are still in their functional years. If they are getting particularly old, it never hurts to replace them a little early.

As we revel in the joyous moments of the winter season, let's not overlook the essential guardians of our homes – the smoke and carbon monoxide detectors. Keeping these sentinels in pristine condition is not just a winter chore but a year-round responsibility for safeguarding our loved ones. At Appliance Rescue Service, while our focus is on maintaining and repairing major appliances, we understand the importance of every aspect that ensures your family's well-being. As you prepare for the winter season, trust us to handle the upkeep of your appliances, allowing you to focus on what truly matters – the comfort and security of your home. Visit our website or give us a call ((214) 599-0055) today to schedule an appointment. Let our dedicated team at ARS keep your household appliances in top shape, ensuring a cozy and worry-free winter for you and your loved ones.


Additional Reading


Why Is My Oven Making Weird Noises 

Halloween Horrors In Your Home?

10 Kitchen Hazards to Avoid this Holiday Season


Kitchen Hazards Unveiled

Your Guide to Oven Safety

Welcome to the heart of the home—the kitchen. Amid the aroma of culinary wonders lies a landscape fraught with potential hazards. From toppling ranges to shattering cookware, the dangers are subtle yet prevalent.


In our exploration, we’re taking a look at the three primary adversaries: range tipovers, cookware mishaps, and the looming threat of cooking fires. These dangers aren't just about burns; they encompass a complex web of risks that demand attention.


Avoiding Common Oven Related Accidents

We’re going to take a look at the three most common types of oven-related accidents. While you think immediately of getting burned, you also have to think of rage tipovers and shattering cookware. 


Range Tipovers

Almost 40,000 people were injured during a 20-year NIH study, just from a range tipping over. Unsurprisingly, children are the ones most at risk. When left unsupervised, kids love to climb, And if an oven door is left open? You can bet they will climb on that, unfortunately, causing the range to tip. 


A few ways you can prevent your range from tipping over- 


If your range doesn’t have one, install an anti-tip bracket to keep it securely in place. 


Never place a heavy tray on an oven door that’s been left open. (This is the most common reason adults get injured in a range tipover.) 


Drape a towel on the oven handle if a pan is cooling to remind you that it’s still there. 


Cookware Injuries

In the same NIH study, more than 37,000 people were injured while using cookware. Hot glassware can shatter (yes, even ‘heat-proof’ dishes), and handles can absolutely burn. 

To avoid both of these instances, remember these tips- 


Don’t take a dish directly from the freezer to the oven or the other way around. 


Don’t add liquid after a dish is hot, or put a hot dish onto a cold or wet surface as it can cause shock to the dish. 


If a dish has become cracked or chipped, stop using it. Those chips will eventually become cracks, spreading over time until the piece shatters. 


Make sure to turn handles out to the sides rather than being over a working burner. 


Cooking Fires

Cooking fires account for 2 of every 5 reported home fires. Of those, unattended equipment accounts for 1 in 3, and half are set off by fat, grease, or oil, according to the National Fire Protection Association. 


In the NIH study, approximately 16,262 people were treated for injuries caused by contact with the stove, most commonly for burns. 


If you spend a lot of time in your kitchen, take a minute to learn these safety tips to protect yourself and your home. 

Stay in the kitchen if you are frying, grilling, or broiling something. 


If you’re simmering, baking, or roasting, stay at home and check on your food often. A timer on your phone can help. 


Make sure to keep anything that can catch fire away from the stovetop. This can be things like food packaging, pot holders, kitchen towels, and cookbooks. 


If a fire starts in your oven, turn it off and leave the door closed. This will suffocate the fire. 

Always keep a lid near to hand to smother small grease fires. You can slide the lid over the pan and turn off the burn. 


Keep a fire extinguisher with a minimum rating of 5-B:C on hand in your kitchen or as close as possible. 


If a fire gets out of hand, leave the house and call 911. 


Gas Ranges vs. Electric Ovens and Safety Concerns For Each 


Gas 

Gas stoves burn natural gas, which does generate a number of invisible by-products. The biggest concern to our health is the production of nitrogen dioxide or NO2. According to Josiah Kephart, an assistant professor in the Department of Environmental and Occupational Health at Drexel University, this is produced when natural gas is burned at high temperatures when there is also nitrogen in the atmosphere. “We’ve known for a long time that [nitrogen dioxide] has many harmful effects on health,” says Kephart. 


While the Environmental Protection Agency regulates outdoor NO2 emissions, there are no standards for indoor exposure. Nevertheless studies dating back decades have shown the harmful effects from the no2 in gas cooking stoves. 


Studies have also found that unburned natural gas leaks from stoves, and contains the known carcinogen, benzene. Additionally, cooking, in general, creates fine particulates, which can cause or exacerbate respiratory problems. 


However, studies in this area have also long been linked to political lobbying groups, so data might be skewed one way or the other. As usual, politics is beyond our purview here, so we suggest doing your own digging. 


Electric 


Recent attention to the gas stove’s environmental impact has turned some away from the once-preferred chef’s stove. However, while electric stoves are the current darling of the industry, they also have their own issues. 


Courtesy of Mike Jones

According to a report by the National Fire Protection Association, they do tend to have far greater fire risks. A 2020 report by the NFPA showed that households with electric stoves reported fires at a rate 2.6 times higher than those with gas stoves. Equally staggering, the death rate of electric-run households was 3.4 times higher than those that had gas appliances. And the injury rate? That was nearly 5 times greater. 


General Safety Tips In the Kitchen 

We’ve taken both general tips and those from the community to bring to your attention. *


You need to be sure you are watching your food and your hands so you do not get burned; both are hot. Pay attention to smooth-top ranges, as the ceramic glass can be very hot for a while, even with the burner off. The same goes for gas stove grates above the burner.


Roll up your sleeves before cooking. Loose-fitting clothing can catch on fire.


Both electric and non-electric ovens have a thermostat to control how high the heat goes, and then they cycle the heat on and off to maintain the correct temperature. Can thermostats go bad? Yes, equally in both electric and non-electric ovens. ((ARS Note: This is one of the key reasons we suggest having your oven maintained regularly!))


Clean the stove, oven, and burners regularly to prevent grease buildup.


Use the right cookware both for your type of range and for the size of the burner. 

Only use cookware in the oven that is meant to go in the oven. Plastics will melt and either damage your oven (ask us how we know.) Metals, on the other hand, can damage the oven by heating it improperly and will almost certainly cause your food to cook improperly. 


Keep items that can catch fire, such as dish towels and pot holders, away [from heat sources].


Overheated foods can cause a fire. With that in mind, cook your food for the recommended cooking time, and use oven mitts to protect yourself when taking it out. 

Plug cooking appliances directly into an outlet. Never use an extension cord for a cooking appliance.

Tuck appliance cords out of reach of children.

If your oven has malfunctioned, it’s not safe to use it. Whether it is gas or electric, it needs to be seen by a professional. You can have gas leaks, your oven overheating, or the heat cutting out randomly and without notice. 


Finally, read the manual for your range. The manufacturer included it so you could get the best experience from your oven, and reading it will only help you. 


And there you have it—a peek behind the oven door, revealing the quirks and perils lurking in our culinary havens. Remember, while your kitchen might be a stage for gourmet wonders, it's also a hotspot for potential misadventures. Stay vigilant, cook safely, and should your appliances ever decide to throw a cooking tantrum, don't hesitate to summon the professionals at Appliance Rescue Service. Until then, may your kitchen adventures be filled with delicious triumphs and minimal mishaps. 

Website 

Office Number:  (214) 599-0055


Additional Reading:

Places to Avoid: The Paw Version! 


Why The Media Wants You To Be Scared Of Your Gas Stove


Help I Melted Plastic In My Oven


*Some commentary may have been adjusted for clarity or length. 


Bugs of Summer: Fleas, Lice, Ticks and Bed Bugs

Can Your Washer & Dryer Get Rid of These Pests? 


One of the things we always love about summer is going out and exploring. New experiences, new cities, new friends and new foods! We even love bringing back souvenirs. What we don’t like to bring back are tiny bitey things that nest in our clothes, our bed or our hair. Fleas, lice, ticks and bed bugs are some of the worst travel companions you can pick up in the summer. While most of us take precautions, sometimes those precautions fail, and you wind up having to get rid of one or many of the little bugs. 


For many of us the first answer is to toss everything into hot water in the washer and then run it through the dryer. But is that always the best answer? Let’s take a look together. 

Courtesy of  Egor Kamelev


Can Your Washer or Dryer Kill Fleas?

Fleas are six-legged wingless creatures that will go after your pets if given half a chance. They love to live in warm, humid areas that are mostly undisturbed. So your pet and their bedding is ideal! An adult female can lay as many as 50 eggs in a single day, and live up to 100 days when left alone. While they won’t live on humans, they can jump up to 13 inches, which means they can easily transfer to you and start to bite on you as well as your pet. 

What are you to do then? Will showering yourself and your pet then throwing all of your soft goods into the washer and dryer solve the problem? No, but it is a good place to start. The hot water in your washer will clean the bugs and any eggs out of your clothes, bedding and all the rest. If you’ve just gotten home from travelling and noticed the problem, go ahead and wash everything you took with you on your trip, and give your pet a good combing and treatment with a flea dip.  If you’re lucky, you’ve caught the problem in time and don’t have anything else to worry about. 


If that doesn’t solve the problem, or if it’s been a few days and you’re just noticing the issue, plus “flea dirt” around the house, you’ll need to kick things up. Start with the same steps as before, wash everything, and especially your pet. Now start on a deep clean. Take your pets outside  and  move all of your furniture around. This gets rid of any hidden areas and exposes them to light and the vacuum you’re going to be grabbing. Now vacuum down everything. If you can’t wash it, vacuum it. When you’re done, either throw away the bag or thoroughly clean the container. Vacuuming is more than just cleaning in this case, you’re also attacking any larvae that are in their coocoons. The  cocoons are resistant to insecticides, so now you can go back through your home and spray things down with the appropriate pet and human safe chemicals, knowing that you’ve gotten rid of them. 

You will need to repeat these steps every other day, for at least 10 days, possibly up to a month, in order to get rid of the infestation, depending on the severity. Make sure to wash your pet’s bedding every week as well. 


Short answer: No, your washer and dryer alone won’t kill all of your fleas, but it will cut out a large portion of the problem. 


Can Lice Be Killed By Your Washer or Dryer? 

Lice - Courtesy of Egor Kamelev 

Lice are another six-legged menace. Lice, unlike fleas, don’t jump. You don’t have to worry about them leaping from person to person, but you do need to worry about them crawling. It’s why lice can go through an elementary school or daycare like wildfire. Fortunately, the CDC has said that head lice don’t survive for long off the human head. 


So, if you had one of the children in your life accidentally bring lice into your home, are you to get rid of it? In this case? Yes, your washer and dryer can kill almost everything.

If the issue is restricted to the bed, this will be the easiest scenario. Start by stripping the bed, down to the bare mattress. Toss everything that can be washed directly into the washer and run it on hot water and then high heat for at least 45 minutes. If it’s something delicate, like that embroidered case from your great-grandmother? It’s ok, just toss it into the dryer and run it for 45 minutes. The heat is what is going to kill the louse and the nits. Everything that can go through one of these two steps can be used immediately afterward. 


Anything that cannot be washed or dried on high heat, stuff it into a garbage bag. These are going to sit for 10 days.  


This is, unfortunately, going also to include your mattress, but you’ll need to do one more step before that. Take your vacuum and go carefully over every inch of it. Any creases, folds or other places that a louse can hide or burrow need to be gone over before you put it into the bag.


After 10 days, you can vacuum everything again and hopefully have gotten rid of your very unwelcome guests. If not, repeat the process as needed, and inspect other soft surfaces around your home as the potential cause of the re-infestation. 

Short Answer: Yes! Your washer and dryer can kill lice, although it shouldn’t be the only step you take in getting rid of them. 

Will Your Washer or Dryer Kill Ticks? 

Ticks Courtesy of Erik Karits

For those of you who regularly venture outdoors, we hear you. We know ticks are *technically* around all year. However, they do tend to be the *most* active between April and September. While these 8 legged beasties can carry some dangerous diseases, you don’t have to confine yourself inside during the warmer months, even in Texas. You can protect yourself, your pets and your home rather easily. Fortunately, most of them cannot survive and reproduce indoors, according to experts.  So your goal is how to get rid fo them if you have you have brought one or more in with you. 

To start with, check yourself and your pets as soon as you get home. Look under arms and legs, behind ears (or inside them for your fuzzy friends), inside your belly button, between your legs and in your hair.  After that, hit the showers. If you’ve been to an area that you know is likely to have ticks, but they didn’t latch on, a shower is a great way to get rid of them. 


What about your clothes, though? For that, toss them in the dryer first on a high heat setting for at least 10 minutes. The high heat not only kills the ticks, it also kills off any young. Since ticks prefer areas with high humidity, not only will they not like the inside of your home, they really won’t like your dryer. If you went camping, you should be able to check the labels and do the same to your backpacks and gear as well.  From here you can wash your clothing as normal and pack away your outdoor gear like you usually would.  


Short Answer: Yes! Your dryer can kill any ticks in your clothing or camping gear, although it should still be paired with prep-work before you go out and careful checks once you come home.  


Are Bed Bugs Killed In Your Washer or Dryer? 

Bed Bugs  Courtesy of  Pixabay

Our final pest is bed bugs. Just thinking about staying in a hotel with them is enough to make you shiver. And don’t think that just because you prefer the nicest hotels means you’re safe. It’s not agree that very few cases of outbreaks are coming from hotels, the vintage ottoman you just picked up, might be a different matter.  Many items like clothing, boxes and secondhand furniture can be a source of bed bug infestations, as they enjoy hiding anywhere people are.  

That’s why it’s not how clean your house is that is going to protect you, it’s being careful about treating things that come into your home. 


If you or someone in your home is waking up with bitchy red bites, especially under their clothes, it could be bed bugs. 

Your first step is going to be to call professionals. Not only do you need to confirm that it’s bed bugs, but you also need to squash the problem as quickly as possible. The longer you wait, the more the bugs can spread within your home, and if you wait too long, outside of it. 

Make sure to get written estimates from anyone you’re considering. They should be licensed experts, able to offer you a written plan of what pesticides they intend to use, what traps or heat treatments and how they’ll use it. While you can purchase over the counter pesticides, they are dangerous to use without proper guidance and it’s unlikely that you’ll be successful on your own. 

When talking to a company, ask all of the questions. A good company will answer them, and a company that won’t answer or tries to pressure you into setting an appointment, is a company you can weed out.  Always ask them about their success rater and if their treatment comes with a guarantee. If it doesn’t, or if they say you don’t need one, that’s another company weeded out of consideration. 

While you’re waiting on the professionals, there’s still plenty you can do, unless you want to burn everything and start from scratch as one of our team suggested. 

Start by sorting anything that’s infested, bedding or clothing, into clean plastic bags. Sort them based on how they need to be washed, and also include a dry-clean only pile.  Then wash and dry everything at the hottest temperature the material can handle. 

While some bugs will die thanks to a dip in your washer, it’s going to be the dryer that kills them. You’ll need at least 60 minutes in the dryer to get rid of them when it comes to the items that you can wash. 

After they’re dried, put everything into fresh clean bags, and do not remove them until the infestation is successfully eliminated.


Thoroughly vacuum everything. Rugs, floors, furniture, beds, any and all cracks and crevices. By cutting down on your existing population, you’re cutting down on the number that can bite you or repopulate. After you’re done vacuuming, put all of the bags or debris into a tightly sealed bag and put it into an outside garbage bin. 


Now it’s time to search all of your furniture. Again, you’re looking for cracks, crevasses, or places that don’t otherwise see much light, like the sides of your mattress or behind the headboard. Don’t forget about inside the beds as well. Look for black stains, blood and fecal matter from the 8 legged biters, discarded skins and the bugs themselves. 


When the professionals have come and done their thing, follow any and all directions that they have, and enjoy having your home free of pests again. 


Short Answer: Nope. Washing alone will not get rid of a bed bug infestation. However it is a very important step in the process. 


Have you encountered any of these summer bugs? How did you handle getting rid of them? Did we miss a step? Let us know over on our Facebook Page. 


Three out of four of our summer bugs can be killed in the washer and dryer, but what if your washer or dryer aren’t functioning properly? That is where we come in. While we can’t protect you from fleas, ticks, bed bugs or lice, Appliance Rescue Service can ensure that your washer and dryer are working properly. You can call us ((214) 599-0055) or go to our contact page to set up an appointment that works with your schedule. We’ll work with you to find the best time to send one of our experts to diagnose and solve the issue. At Appliance Rescue Service, getting your home running smoothly is our priority. 

Why Is My Oven Making Weird Noises

6 Weird Noises Your Oven Can Make and What They Mean


Rattle rattle click, rattle click, rattle rattle click, boom! No, it's not the latest song; that's your oven. The question is, why is your oven making strange noises? 


Some noises your oven might make: 

  • Clicking

  • Popping

  • Wompf 

  • Beeping

  • Rattling 

  • Squeaking


Clicking 

 This is the most normal sound you can hear coming from your oven and also the least dangerous. Your oven might click when it is heating up, cooling down, or right when you turn it on. If that's the case, it's because the heating element is warming or cooling, and the metal is shifting. This is very common and older ovens. If the sound has recently become very loud, though, it can mean that your heating element is approaching the end of its lifespan and needs replacing soon. This can take several years of regular use. Most people will replace their oven long before the heating element goes out.

A modern oven has very precise coils that do make some noise as they work. So if the sound is while your oven is being used, this is a good thing. It means that the control coils in your oven are working as they should be.

Courtesy of Mike Gattorna

If you have an older gas oven, cooking is also normal; it means that the igniter is doing its job correctly. If your gas oven isn't clicking at all it might be a cause for concern as it can indicate that the igniter isn't working for one reason or another. if this is your situation please get your oven serviced immediately as it might be a buildup in the gas lines of the oven.


Why is my oven popping?

Well, there are many different sounds that your oven can make one that you never want to hear is popping. If you hear a popping or crackling sound that cannot reasonably be explained by your food immediately turn off your oven. This is either the wiring or other electrical components in your oven or the electrical outlet that it's connected to malfunctioning. The sound might also be accompanied by the smell of burning plastic. If that's the case, your oven is not only malfunctioning, it has begun to scorch and you need to immediately turn it off and disconnect it you can have a professional see it. 


My oven just made a strange WOMPF  sound! 


Courtesy of Max Rahubovskiy

Think of the most terrifying sound that could come from your gas oven. Are you thinking of it? Is it an explosion? To us there is nothing more terrifying than the boom or WOMPF that a gas oven can make when igniting improperly. What's happening here is that the gas is igniting after having built up. While this is a common occurrence for people with gas ovens it is not normal. If the gas is building up like this it means that one or more of your igniters is dirty. Having the gas flow or ignition system being restricted can lead to danger. A dirty igniter by itself is not a terrible danger. If you have your oven maintained regularly, getting the igniters cleaned and replaced as needed, you'll be in good shape. However, if you try to clean them yourself, it is very easy to scrub too hard and unintentionally cause a gas leak. While the small boom you might hear from your oven is not usually dangerous, a gas leak always is. 


Why won't my oven stop beeping?

Assuming that your oven is not beeping while preheating, coming to temperature, or because of a timer, there are two reasons your oven will beep. The first reason is that your oven is overheating. Many ovens have overheating issues, especially if you live somewhere, that's rather toasty during summer, like Texas, for example. Occasionally components within the oven can break, causing uncontrolled heating in the oven's primary heating element, which can cause it to sound a beeping alarm to alert you before it damages the oven or starts a fire. 

The second reason your oven might begin beeping at random is that there is damage or a short in your control panel. This can happen if your oven is close to a source of water or if your house has recently had any flooding or leaking issues. A shorted panel can beep at random or, even more annoying, keep beeping consistently. Make sure to call up a technician before you go delving into the depths of your oven to figure out the reason since some of these have high-voltage components. 


My oven is rattling; why?

Courtesy of dmitry-zvolskiy

Another common occurrence with your oven is having it rattle while it is running. If you recently had to move your oven or do a minor repair, that could be the reason. You can take a look at the back panel and the bottom cover to see if there are any loose screws. If that's not the case, it might be your oven fan. At that point, we again recommend calling in a professional to ensure that everything is secured properly.


Why has my oven started squeaking recently?

If your oven has recently begun squeaking after you turn it off, this is an easy problem to diagnose. It's your cooling fan that is sounding like a rogue rodent. This isn't the same as the convection fan located at the back of your oven. Instead, it's located on top. Given its positioning, this fan Austin falls victim to rising food particles and, over time, gravity. That will weigh it down, unbalance it and cause it to make creaking grinding or squeaking sounds. Fortunately, it just needs a good cleaning. Unfortunately, its location makes it a bit difficult to get to. Take a look at your owner's manual to see if it has any suggestions for how to go about cleaning it more easily.


Did we manage to answer your worries about your oven? If not, let us know over on our Facebook page. As always, we love to hear from you, and nobody wants to deal with an oven making noises at all times of the day and night.


 If you diagnose the problem, but you still aren't comfortable with the sounds that your oven is making, or you want it to be fixed by a team of professionals, feel free to reach out to us via our contact page or by giving us a call at ((214) 599-0055). We'll work with you and your schedule to find a time and date for our technicians to come out and find out what's going on. At Appliance Rescue Service, our top priority is getting your home running smoothly again.


Why Does My Oven Keep Flipping the Circuit Breaker?

What Is Going On And What’s Wrong With My Oven?

Picture this: You're making dinner for your family, and you realize that after half an hour, the oven hasn't beeped to say it's been preheated. You go to check on it and realize that the oven is off. You push a few buttons, thinking, ‘that's odd I know I turned it on’, and instead, you have an oven that won't turn on. Your breaker flipped somehow. You go to fix it and start the process all over. Weird, but not the end of the world. What if it keeps happening, though? That's when you have to question, “why does my oven keep flipping my breaker?”


There are three main causes that will make it happen. It could be that you have a faulty heating element. It could be that there is an electrical short in your home. Or it could be that there is a circuit overload in the system. We'll go over these one-by-one and help you tell how to identify between each of them.


It Could Be a Broken Heating Element 

Let's start at the most common cause of this issue. If your breaker for your oven is flipping it might be because a heating element is broken. This can either be the heating element itself or the power source to the heating element. If this happens your circuit breaker will perceive it as a dangerous shift in the amount of amperage in the circuit and trip in order to keep you safe. This is built into the system in order to prevent electrical fires.


If you do determine that one or more of the heating elements in your oven is broken you will need to do a few steps. One unplug the oven completely from the wall and if possible, pull it out a little bit as well. This is to ensure your safety. What you're doing is giving the oven the chance to discharge any and all electricity. 

Next call a technician. Going in and attempting to repair or change out a heating element on your own is it dangerous and is not something we recommend.


It Might Be A Short In the Electrical System 

Your next most common cause of a consistently tripping circuit breaker is that there is a short in the electrical system. This can occur anywhere from the circuit panel itself all the way to the heating outlet of your oven. Look out for the smell of burning rubber or plastic, whether the oven is on or not. Also, keep an eye out for smoke. (Good news! The oven smoking because you burnt the turkey is not an electrical short.) 


Fortunately, if this is the issue, not only is it less expensive, it is also easier to fix. We still recommend unplugging the oven and calling a technician in order to ensure both of your safety and that of the tech coming to your aid. 

Or You Might Be Dealing With A Circuit Overload

Your final possibility, although admittedly the least likely, is that you are having a circuit overloaded. This would mean that the circuit that your oven is on is drawing so much power that the circuit breaker believes there is an issue. This means that there are too many items consuming electricity on the same circuit. Now the trick here is to figure out whether you actually have too many items or whether your oven is not on a circuit that is strong enough for it. For this, you'll need to start by figuring out which circuit your oven is on. 

Normally this is pretty easy. All you have to do is go to your breaker box and find out which one is labeled kitchen. However, occasionally you'll be in an older home where the breaker wasn't labeled when it was installed. And so you're going to have to check one by one, switching breakers off. Once you have the correct breaker isolated, start unplugging items that are on that breaker. You want to see at what point you can have your oven on and other items plugged in. If you get to the point that you have everything unplugged and when you turn the oven on it still gets flipped off by the circuit breaker, there is another potential answer. 


That is that your oven is on an outlet that is too small or it is not high enough power. While this is uncommon, it does happen occasionally, especially if construction was rushed in your neighborhood or if the oven you brought with you from your old home is sized to a different power outlet. Fortunately, both of these are extremely uncommon, and it is far more likely that your issue will be related to one of the earlier two points that we made. 

If you have isolated everything else and guaranteed that your issue is indeed tied to your circuit breaker, then you will not necessarily need a technician so much as an electrician they will actually be the first call that you make. However, we do still suggest unplugging the oven for safety sake.


Are there any reasons for an oven to cause your circuit breaker to flip that we missed? Let us know over on our Facebook page as we would love to hear from you!


If you followed our tips and found out that yes it is one of the first two causes, feel free to reach out. We would be more than happy to help you in repairing your oven and get your home running smoothly again. You can reach out to us with a phone call or by going over to our contact page. At Appliance Rescue Service, our goal is to get your home running smoothly again.