Demystifying Refrigerator Types: Choosing the Perfect Fit for Your Home

Exploring Refrigerator Types: A Comprehensive Guide

Navigating the realm of refrigerator options can be a daunting task. With a myriad of choices available, from top freezers to French doors and column refrigerators, the decision-making process can feel overwhelming. In this article, we strip away the complexities of features and hone in on the fundamental types of refrigerators, each suited to different needs and lifestyles. Join us as we explore the diverse landscape of refrigeration options, offering insights into which style might best complement your household requirements.


When you have a ton of options, it's not always easy to compare different refrigerator types. Not only do you need to look at how the refrigerator is put together but you also have all of the various features that you have to pick and choose from. We are putting aside the features in this article. Instead, we're looking at just the different types of refrigerators that you can purchase and what they might be best for.


Top Freezer

The top freezer is straightforward, just with the label says. You have your freezer on top and a larger refrigerated cabinet underneath.

Pros and cons for a top freezer

Pros

Basic

Easy to find

You don’t need a ton of space

Cons

Very bare bones in design

Rarely comes with additional features

A top freezer is great if you need to have a refrigerator yesterday. Or if you are looking to add an extra refrigerator to your household but it doesn't need to be the main refrigerator. You may want one for a guest house or for the man cave you're putting together. A top freezer refrigerator is great when you need something simple.


Bottom Freezer

A bottom freezer is what happens if you take a top freezer and put it on its head. Voila, bottom freezer. Typically, the bottom freezer will be a drawer rather than just a door opening the way a top freezer is .

Pros and cons for a bottom freezer

Pros

Has more space than a top freezer

Costs less on average than other fridge options

Cons

Hard to keep organized

Fewer shelves or compartments

A bottom freezer, in our opinion, is the best if you're looking to expand your storage. Maybe you now have teenagers in the house, and they eat a lot. You may be combining households and you need a way to store all of the extra food. Whatever the case, bottom freezers are fantastic for maintaining your sanity and adding storage. 


Side by Side Refrigerator


A side-by-side refrigerator is the same dimensions as a standard refrigerator but with a split all the way down. This separates one side as a freezer and one side as a refrigerator.

Pros and cons for a side-by-side refrigerator

Pros

No stooping for items in your freezer

Has a lower door clearance

Lots of organization options

Cons

Fridge and freezer are thinner than standard

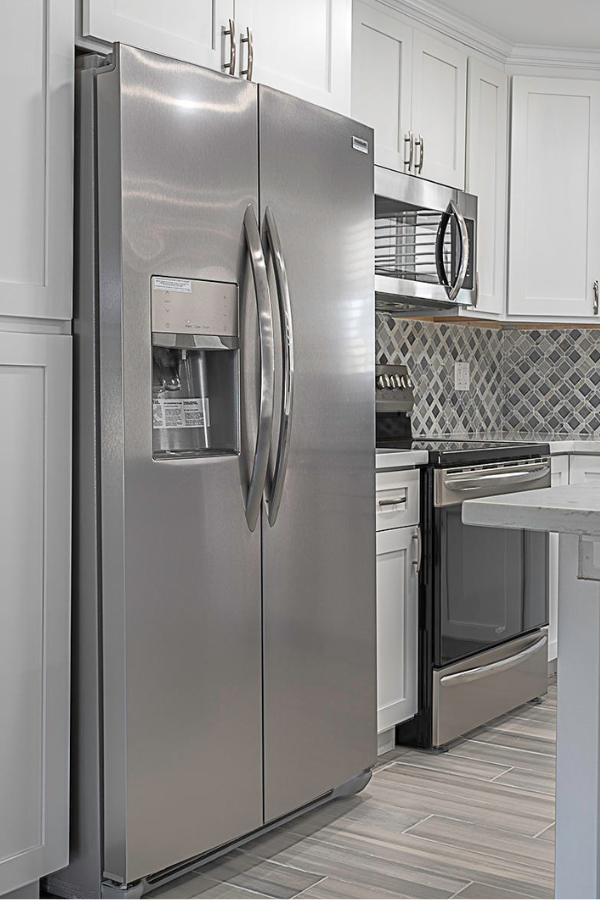
Difficult to store wide objects like sheet pans

Due to design, many will have issues with temperature differences between the top and bottom of the fridge side.

This is dangerous for items up top if the fridge is too full.

We think a side-by-side refrigerator is a good first step if you're looking to move beyond that first dorm room fridge. You want something a little nicer but you're not ready to go for some of the other models just yet. Or if you don't need to store a ton of food, a side-by-side is great.


French Door Refrigerator

A French door takes a bottom refrigerator and combines it with a side-by-side You have the larger refrigerator compartment but the ease of opening only one door at a time. You also have a lovely large bottom-drawer freezer. 

Pros and cons for French door refrigerators

Pros

Full size or larger fridge and freezer

Most common variety of freezer

Manufacturers make them with lots of different feature options

Has better temperature control than other varieties

Cons

Most will have drawer freezers

Often are wifi enabled by default

This is great if you've got a large family. Not only do you have the larger space of your refrigerator, but you also have more features and better temperature control, which means your food is going to last longer. It's also great for those times when “but I don't know what I want” ends in leaving one door open for ages, staring at the food. 


Column Refrigerators

Finally, we have the ultimate in customization, the column refrigerator. You can choose whatever you want it to be and almost any size. Whether it's a refrigerator, freezer, or wine cellar, it's all possible. The difference is that each column will be an individual unit. It's not a two-in-one.

Pros and cons for column refrigerator

Pros

Built-in

Concealed behind panels

Can be modified for whatever you want

You can control the temperature, humidity, and even vibration

Cons

Customizability = price hike

You have to have at least 2, one for a refrigerator and one for a freezer

We see more and more clients leaning towards the column refrigerator because they are so very customizable. If you want the ultimate in refrigeration, this is what you're going to be looking at.


Finally, we want to touch on a few different terms.

Counter depth 

This isn't actually a type of refrigerator, it's more of a feature. What it means is that you have an open enclosure in your kitchen it will slot in and be flush with your counter, not counting the doors and handles. If this isn't something you specifically need though, we advise not bothering. They're fantastic if you're looking for an aesthetic. But they really cut down on the amount of space that you have.

Freestanding 

A free-standing model is all about versatility. These are the ones where you go to a store and pick out the exact features you want. Depending on how much food you need to store, you might choose a counter-depth one or a full depth. They're designed to be relocated as needed and are chock-full of features so that you do become attached to them.

Pros and cons for a freestanding refrigerator

Pros

Lots and lots of features

Some customization

Can have counter-depth or full depth

No need for professional installation

Less expensive

Width options, up to 36”

Door style options

Easy to relocate

Cons

Shorter lifespan, compared to built-in

36” in width isn’t always enough

Even if you get a 24” depth refrigerator, due to the doors and handles, it won’t actually be flush with your counters.

Built-in 

Built-in refrigerators, on the other hand, are any type of refrigerator that is built into your kitchen. Your cabinets, your counters, all of these wrap around your refrigerator and make it extremely difficult to remove. But if you're building your dream home and you have no intention of moving, then the mobility of the refrigerator doesn't matter much.

Pros & Cons for a built-in refrigerator

Pros

Typically taller

Fully Customizable

Cons

Doesn’t move if you do

Only 24” deep to match your counters

Costs far more

Must be professionally installed

As you weigh your refrigerator options, remember that Appliance Rescue Service is here to support you beyond the selection process. Whether your appliance is in need of repair, maintenance, or restoration, our team specializes in servicing a wide range of major appliances. With our expertise and dedication to quality craftsmanship, we ensure that your appliances remain in optimal condition, serving your household for years to come. Don't hesitate to contact us today to schedule a repair appointment or visit our website for more information on our services. Trust Appliance Rescue Service to keep your appliances running smoothly.


Additional Reading
Frigi-Know: Your Guide to Refrigerator Troubleshooting

An In-Depth Look At Refrigerators

Spice Up Dessert: Walnut Cayenne Tahini Cake

A Flavorful Twist on Classic Baking

Get ready to tantalize your taste buds with our Walnut Tahini Cake recipe! Brace yourself for a flavorful journey where nutty walnuts, creamy tahini, and a hint of cayenne collide in a symphony of taste sensations. Despite its fiery name, rest assured, this cake brings the perfect balance of sweetness and spice. So, roll up your sleeves and let's dive into baking bliss!


Ingredients

1/4 cup butter

1/2 cup shortening

1 1/2 cup sugar

3 eggs

1/2 teaspoon baking powder

1 1/2 cup flour

1/4 lb walnuts

1 tablespoon tahini

1/2 teaspoon ground cayenne

1/2 teaspoon ground cinnamon

1/2 cup milk


Tools

mixing bowls

spoon

measuring cups and spoons

mixer (hand or stand)

knife

cutting board

nonstick 8-inch pan

plastic butter knife

parchment paper

pencil

scissors


Yes, it says "cayenne" in the title. No, the cake is not spicy. No need to panic.


For best results, start with all ingredients at room temperature, and do not preheat the oven!


Set your round pan on a sheet of parchment paper and trace around the base with a pencil. Trim off the excess with the scissors. Set your parchment circle into the bottom of the baking pan as a liner to prevent sticking. The cake you're about to make gets awfully comfortable where it is and doesn't like to leave the pan again without an assist, so skip this step at your own risk.


Dump out a comfortable amount of walnuts onto your cutting board, grab your knife and chop them as fine as you like. Due to picky eaters in the household, we went extra fine with ours. Scrape the cutting board off into a mixing bowl and repeat the "comfortable amount of walnuts" thing as many times as necessary to get through a quarter pound. We used a small cutting board and did it in three waves. If you have a larger board - maybe one of those comically huge industrial ones - surely the whole quarter pound at once is no obstacle for you.


Measure your flour, baking powder, cayenne, and cinnamon into the mixing bowl full of walnut pieces and stir them all together until everything is fully incorporated.


In another mixing bowl, cream together your softened butter and shortening. Add the sugar slowly, mixing all the while. You'll get a granular, fluffy, pale concoction in a minute or two.


Add one egg and your tahini. Run the mixer until you have one uniform color, then proceed to add the other two eggs. Try not to overmix, but don't leave any yolky spots.


Add your dry ingredients slowly and stir them into the wet ingredients by hand until everything has been dampened. Now you're safe to add your milk - again slowly, and again mixing by hand.


Feel free to bring back the mixer now to finish it off and get rid of any lumps. (We just didn't want the high speed with the thin liquid sitting on top of lumpy mush.)


Pour your batter into your lined baking pan, pop it in the oven, shut the door, start the oven heating  to 350 and set a timer for one hour and ten minutes. Do not open the oven door - at all! Not even to check on it! Turn the oven off when the timer finishes, but leave the door closed another ten minutes before removing the cake so it can cool.


After it's had a chance to cool for 20 minutes or so, work around the edge with a plastic knife. Again, this cake likes where it is and will need to be convinced to move. The parchment should ensure the bottom just pops free after you've loosened the sides.


Serve warm.


As you savor the last crumb of our Walnut Tahini Cake, consider the magic that lies within your kitchen. Yet, even the most beloved recipes encounter hiccups along the way. Should you find yourself facing challenges with your major appliances, like your stove or oven, remember that Appliance Rescue Service is here to lend a helping hand. Don't let appliance woes disrupt your culinary endeavors. Schedule a maintenance appointment via our website or give us a call, and let our expert technicians ensure your kitchen runs smoothly. Until next time, happy baking!

Contact Page

(214) 599-0055

Decoding the Dishwasher Dilemma: Upgrade, Downsize, or Stay Put? Your Comprehensive Guide to Smart Choices

Beyond Suds and Rinses:Tailoring Your Dishwasher Choice to Fit Your Lifestyle


We are not often the ones to tell you to give up on a dishwasher that works. After all, one of our key mottos is that we will keep trying to fix something until you tell us to stop, so long as it is fixable.* So why would we, clients rescue services, tell you to replace your dishwasher? Well, there are a few circumstances where it's just necessary.

Choosing a Dishwasher for a Bustling Household

If your family has recently grown by two or three people, congratulations! Whether it's a marriage, birth, or family moving in, when you add more people to your household, your dishwasher is going to be used much more often. And that four-setting dishwasher that you had before isn't going to be able to handle now having a family of six or more, at least not without being run multiple times in a day. At this point, you might look into a larger model with more features to help deal with all of the dishes that you now need to get done.

Growing Family
Courtesy of Craig Adderley

You might look at features such as fold-down tines or rows to add in space and ensure everything gets cleaned. Cooking for larger groups also includes larger pots, so an adjustable or free-flex rack can help get dinner dishes taken care of quickly. Info lights and auto-release doors are features that we adore as they let you know if your dishwasher is done and ready to unload. (Honestly, these are just the tip of the iceberg when it comes to features, but they are some of the most useful in our opinion.)

Compact Dishwashers: Small Size, Big Efficiency

The flip side to that is if you're downsizing your home, potentially an equally joyous time. It might be that the kids have all survived to adulthood and are starting their own homes. It might be that you're living on your own for the first time, and you don't need a large dishwasher. Or it might be that you're outfitting a mother-in-law suite. Whatever the case, you don't always need a full-size dishwasher. Instead, you can consider how many people you're doing dishes for and whether a compact dishwasher might not serve you better.


Empty Nesters

Courtesy of Kampus

So this would lead you to question what is a setting, and what is the smallest dishwasher I can use? So according to the Association of Home Appliance Manufacturers, a full setting includes the following: a large dinner plate, bowl, knife, small snack plate, coffee cup, two teaspoons, a saucer, drinking glass, dinner fork, and a salad fork. Most dishwashers on the market can fit between 10 and 12 full settings and are approximately 24 in. A compact dishwasher fits a setting and is typically only 18 in as of the time of writing. While there are other even more compact dishwashers, such as one that can be set up in your sink, we advise against those. As of yet, the engineering in them is not the best, and we cannot guarantee your dishes coming out clean or in one piece.


Beyond the Bills: Energy and Water Efficiency in Dishwashers

My Electric Bill

Courtesy of Google Deepmind

Or if you're struggling with an exorbitant energy bill or water bill, you might want to look into a new model to replace your old workhorse. Just because it still runs perfectly doesn't mean that it's still serving you best. As we've talked about many times, with every passing year, companies are making more efficient dishwashers. If you want to learn more about energy-efficient dishwashers, we'll share our post going into what defines energy and water efficiency and how to find them, in the Additional Reading section at the end.


Deciphering Decibels: Finding Your Ideal Sound Level

If your current dishwasher can wake the dead… Maybe you have a new baby in the house, or you have somebody who's ill and needs as much sleep as they can get. If it's not a matter of something being faulty, a new dishwasher might be a better choice.

Finally some quiet

Courtesy of sound-on-

While dishwashers used to average about 60 decibels, we've come down to 45 to 50 being the standard, with some models being as quiet as 30 decibels. To better illustrate that an older dishwasher would be around the level of a loud vacuum, the average for modern dishwashers is about as loud as typing on your keyboard, and 30 decibels would be someone whispering near you. Additionally, modern dishwashers are designed with advanced noise reduction technology built into the frame. This might mean additional soundproofing; this might mean better-joined components, whatever it is, the manufacturers are working on making them quieter with every generation. More recently, however, the dishwasher space has changed. Where older models averaged about 60 decibels—just below the sound level of a vacuum—modern dishwashers average between 45 to 50 decibels, which is about as loud as typing on a keyboard. It’s not completely silent, but also not loud enough to wake someone up.

Signs It's Time to Let Go: Beyond the Obvious Breakdowns

Or in the rare cases when we've tried everything, and we have to say we can't fix it. It's not often, but occasionally we do run into appliances that we can't fix, or getting the parts to fix them is worth more than purchasing an entirely new model. While we are always eager to help keep your home running smoothly, we do understand having to balance your checkbook against practicality.


We will always try our best to keep your home running smoothly. Whether it's your dishwasher giving you fits or your washer isn't draining properly, Appliance Rescue Service is here for you. You can get hold of us via our website or by giving us a call at ( (214) 599-0055). We'll work with you to find a date and time that works for your schedule and send one of our expert technicians to get the job done right.

*If something is shattered on the floor or has met its demise in an irreparable state, we reserve the right to reconsider our stance—because even we can't work miracles on shattered dreams or appliance ghosts.

Additional Reading

5 Energy Efficient Dishwashers For Your Home

Dishwasher Deep Dive


Kitchen Safety 101: Protecting Your Little Ones at Home

Beyond Baby Gates: Safeguarding Every Corner of Your Kitchen

Babies are chaotic. When they start learning how to move their limbs, they will grab everything they possibly can and kick everything within reach. Once they gain mobility, it is an all-out war between you and the baby. No matter how much you love them, trying to keep them safe is difficult because safety is not a concept they understand. Therefore, your job is to baby-proof your entire home against anything they can get up to. That's where this week's article comes in. We are taking a look at your kitchen and the mischief your baby can find, whether you're looking or not.


Baby chewing on a utensil - Courtesy of Yan Krukau

Let's start when your baby is still non-mobile. At this point, you have to carry them everywhere. Unfortunately, they can still get hurt in your kitchen. All it takes is a kick or a flailing hand that grabs hold of a spoon and both you and the child are covered in something. If you're lucky, it's something that's cool or room temperature. If you're unlucky, it's something boiling, and you now have a burned baby.


You can prevent this by making sure pot handles, and utensils are turned towards the inside of your stove if you are working at the stove while holding your little one. You can also look for clips that will clip to the side of a pot and hold a spoon or spatula in place to keep little hands from grabbing and pulling. 


Another major issue is stove knobs. They click, they turn, and they push! To a baby, it's the best thing in the world whether they're in arms or crawling and standing on their own. To keep little ones from lighting themselves or anything on top of the stove on fire, there are a couple of different methods you can use. If it is a temporary issue, you can just remove the stove knobs. Most stove knobs will pop off of a central rod very easily for cleaning. Toss them all in a dish outside of baby reach, and you're good to go. Some families are perfectly happy doing this as a measure until the child is big enough to be left on their own; others aren't. Use it at your discretion. The next option is a cover. There are knob covers that will clip over the top of the knob and can be very easily opened when you need them, but they are a little more complicated than most babies can figure out.


And other than pulling at paper towel rolls or any hanging things, that's about it if your baby is in your arms.  But like all things, babies grow. 

Once your baby is mobile, you need to do more than just make it so they cannot push or pull things. Now, you need to be concerned with everything.  

Baby climbing over a baby gate Courtesy of Jep Gambardella

Most people will start with the straightforward baby gate. If a baby can't get into the kitchen, they can't cause problems. You also don't have to baby-proof anything else within the kitchen. However, your blogger would like to point out a number of children in her acquaintance who figured out how to climb over baby gates at a far more rapid pace than is usually thought possible. So, in the interest of keeping your particular small human safe, we advise considering further steps. The baby gate should be the first line of defense but not the only line.


What about cabinets and drawers? As your child starts to explore, like we mentioned, they'll want to pull on things. At first it might be simply a matter of pulling as they figure out how to get up and things accidentally coming open. But very quickly, that turns into repeating to see if they can do it a second time. And once they've figured out the precise mechanism of it, they'll want to keep doing it because there are things hidden behind the door or drawer. There are latches that can be attached to your drawers and your cabinets. These are great for keeping small children out. Some varieties have clips, some varieties have magnets, some varieties are the DIY version, and just have a rubber band. Take your pick. Our point here is just to keep your child out of pots, pans, food boxes, and cleaning supplies that might be on their level. These latches can also work on your refrigerator. The model you have will inform you how best to apply them. 


As a side note, if you have the space, we advise moving your cleaning supplies entirely out of reach of small children. While many of us store our cleaning supplies under the kitchen sink, even cabinet latches are capable of failing. Given the poisonous nature of most cleaning supplies better to keep them entirely out of reach.

Baby getting into a drawer Courtesy of PNW Production

The next thing to consider is the oven door. Whether you have a stove and oven combo or an oven that stands on its own, the door handle for an oven is a great place for little hands to reach and grab and then use it to lever themselves up into a standing position. Once again, the latches that we mentioned earlier are a great way to keep the oven from being opened. However many of them still have a small amount of give to them. While this is acceptable for a cabinet, an oven that is on can easily lead to burns if little fingers get in between. Another option to double up protection is to put high-backed chairs in front of the oven. If they can't get to the oven, they can't open it. 


Finally, understand that no amount of baby-proofing will stop the force of nature that is a baby. The best thing that you can do is to prevent what you can and stay aware of your child or make sure that somebody is paying attention once they gain mobility. If this isn't an option, consider setting up a separate area enclosed within the kitchen so that you can keep an eye on your little one without them getting out.


As we conclude this guide to baby-proofing your kitchen, we hope you've found valuable insights to create a safer environment for your little ones. Remember, a secure home is a happy home.


If you have additional baby-proofing tips or want to share your experiences, join the conversation on our Facebook page.


It's essential to recognize that malfunctioning kitchen appliances pose a threat not only to babies but to everyone in the household. Vigilance and regular maintenance are key to preventing accidents.


At Appliance Rescue Service, we understand the importance of a functional and safe kitchen. For all your major appliance repair needs, reach out to us at (214) 599-0055 or visit our website. We're here to ensure your appliances are in top-notch condition, promoting a secure and comfortable home for you and your loved ones.

Thank you for entrusting us with your appliance care. Stay safe and secure!


Additional Reading

10 Kitchen Hazards to Avoid this Holiday Season

Why Does My Oven Keep Flipping the Circuit Breaker? 

Bugs of Summer: Fleas, Lice, Ticks and Bed Bugs

Savor Every Bite: Mastering Pork Chops with Baby Potatoes and Onions

 Elevate Your Culinary Skills with a Flavorful Homestyle Dish

Indulge in a savory delight with our mouthwatering recipe for Pork Chops with Baby Potatoes and Onions. This simple yet flavorful dish is perfect for busy weeknights or casual gatherings. Packed with wholesome ingredients and seasoned to perfection, it's sure to become a family favorite in no time.


Ingredients

4 or 5 thin boneless pork chops

1 red onion

1 1/2 lb baby heirloom potatoes

3 tablespoons olive oil

2 tablespoons red wine vinegar

1/2 teaspoon rosemary

1/2 teaspoon parsley

1/2 teaspoon oregano

salt and pepper to taste


Tools

large skillet

knife

cutting board

measuring spoons

tongs or spoon


You know what we're going to say here, but we'll say it anyway: wash your veggies before you begin.


Chop your baby potatoes to half-inch wide chunks. You'll see in the photos we actually have some purple potatoes in the mix - we found "gemstone medley potatoes" in the store this week and decided to try them.They make a great visual pop, without altering the flavor. 


Drizzle the olive oil into the skillet and start the potatoes cooking on medium-low. We like to sprinkle them with a little salt at this stage, but you can omit the step if you prefer. Stir occasionally. 


While the potatoes cook, slice your onion, the thinner, the better. Flip it into the skillet when you're done, and open up the package of pork chops.


Season your pork on both sides with the rosemary, oregano, salt, and pepper. You don’t need to crust it with spices, but a good dash of seasons is important. 


 Don't add it to the pan yet - those potatoes will take quite a while to cook, and the pork will most likely be done quickly. Just let it rest where it's at, and go stir the potatoes and onions.


Once the onions are translucent, you can add the pork to the skillet. Nudge the potato and onion mixture to one side of the skillet and lay the pork chops in the open half. Once they're down, try not to disturb them for three minutes. You can continue to stir the potatoes and onions occasionally during that time.


When your time has elapsed, flip the chops and let them cook through on the other side. Splash the pan with the red wine vinegar, add a little more salt and pepper, and give the potatoes and onions a stir again. Let everything simmer for a few more minutes until the pork is done.


If you're unsure whether or not the meat is done, you can grab a meat thermometer and check. The safe temperature is anything over 145 degrees, although we normally shoot for 155 or higher.


Assuming your pork chops have reached the safe temperature, go ahead and remove them to a plate to let them rest a few minutes while the potatoes finish up (stubborn things that they are). The potatoes are done when they spear easily with a fork.


Elevate your weeknight dinners with our delectable Pork Chops with Baby Potatoes and Onions recipe. Simple yet satisfying, this dish embodies comfort and flavor in every bite. Whether you're cooking for family or friends, it's sure to impress even the most discerning palates. So why wait? Treat yourself to a culinary delight that's as easy to make as it is delightful to devour. Enjoy!


When your kitchen appliances falter, it's more than just an inconvenience – it's a disruption to your daily life. Imagine the frustration of a dishwasher that refuses to clean or a refrigerator that can't keep your food cold. At Appliance Rescue Service, we understand the urgency of these situations. With our team of skilled technicians specializing in the repair of major appliances like washers, dryers, dishwashers, ovens, stoves, refrigerators, freezers, and ice makers, we're here to restore functionality to your kitchen. Our commitment to prompt, reliable service means you can trust us to diagnose and resolve issues efficiently so you can get back to enjoying the convenience your appliances provide.


Discover peace of mind with Appliance Rescue Service, your trusted partner in appliance repair. We specialize in the maintenance and restoration of major household appliances, including washers, dryers, dishwashers, ovens, stoves, refrigerators, freezers, and ice makers. With our team of skilled technicians, we deliver prompt and reliable service to ensure your appliances operate at peak performance. At Appliance Rescue Service, we understand the inconvenience of a malfunctioning appliance, which is why we prioritize efficiency and precision in every repair. Whether it's a noisy dishwasher, a malfunctioning refrigerator, or a faulty dryer, our experts have the knowledge and experience to diagnose and resolve issues promptly. We take pride in our commitment to customer satisfaction, striving to exceed expectations with every service call. With transparent pricing and honest assessments, you can trust us to provide cost-effective solutions tailored to your needs. Don't let appliance troubles disrupt your daily routine. Trust Appliance Rescue Service to keep your home running smoothly. Contact us today to schedule your next repair appointment and experience the difference firsthand.


Contact Page

Call Us : (214) 599-0055